OBD-II GPS Vehicle Tracker Installation Guide
This is part of a series of installation guides for installing GPS Tracking Devices in your cars or trucks or in your assets.
OBD-II Vehicle Tracker Installation Guide | Hardwired Vehicle Tracker Installation | Battery Powered GPS Tracker Installation Guide
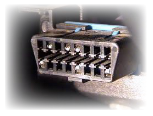
OBD-II Vehicle Diagnostic Port
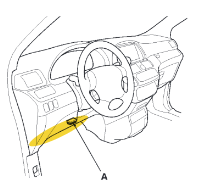
THE OBD-II Port Under The Steering Wheel
Plug & Play Fleet Tracking Devices
This is a guide for installing an OBD-II GPS Vehicle Tracker in cars or trucks in your fleet. If you came across this page as you were looking to install a wired gps tracking device in your vehicle, this isn't the page for you – but we've got you covered over here: GPS Vehicle Tracker Installation Guide. Similarly, our battery powered GPS trackers are covered here: Battery Powered GPS Tracker Installation Guide.
OBD-II GPS Vehicle Tracker: Install Guide Intro
This guide focusses on the installation / use of OBD-II trackers. This family of GPS trackers utilizes the vehicle diagnostic port in most domestic vehicles. Most vehicles are compatible with the OBD-II standard, but some are not. Check your vehicle's owner's manual to determine if there is a potential issue.
OBD-II Background
The OBD-II specification is controlled by the Society of Automobile Engineers and defines the method for requesting diagnostic data and provides a list of standard parameters from the engine control unit. The specification was first released in 1979. Today, depending upon the vehicle, the tracker can retrieve values that include: throttle, engine RPM, fuel available. In some vehicles, the device can even retrieve engine diagnostic codes.
Where is my OBD-II Port?
The OBD-II diagnostic port, also known as a Data Link Connector (DLC), is generally located on the driver's side of the car or truck under the dash. The location will vary between different manufacturers, models, and production years of a car or truck model. Consult the vehicle owner's manual for detailed location information. For additional help in locating the OBD-II socket, go to this external source: obd-2 locator.
Tracking Device Installation
- Prior to installing the device, make sure the vehicle is parked on level ground with the ignition off.
- If the device has and on/off switch, make sure it is in the on position.
- Insert the device into the OBD-II socket in the vehicle.
- Start the engine.
- Verify both the GSM(Green) and GPS(Blue) LED lights flash as appropriate to the device.
- Check your account on our system to confirm the device has reported.
Tracking Device: In Operation
Once connected to the cellular and satellite network, the LED lights on the device will flash slowly. Please note, it is normal, in some cars, for the LED lights to turn off after a few minutes.
Testing Tracking Device Installation
With the creation of your account, a username and password were sent to you for our tracking website. Logon to the system and go to the reports section. Run the unit list view report. Check to be sure the tracking device is reporting ignition on/off events.